
How to Pack a Cooler for Camping: Tips and Tricks
Last updated on August 13th, 2024 at 12:19 am
When it comes to camping, packing a cooler is essential for keeping food and drinks fresh and cool. However, packing a cooler can be a bit of a challenge, especially if you’re not sure what to bring or how to pack it efficiently. In this article, I will share some tips and tricks for packing a cooler for camping, so you can enjoy fresh and tasty food throughout your trip.
The first step in packing a cooler is to choose the right cooler for your needs. Consider the size of your group, how long you will be camping, and how much food and drinks you will need to bring. Look for a durable, easy-to-carry cooler, and good insulation to keep your items cool for as long as possible. Once you have your cooler, it’s time to start packing.
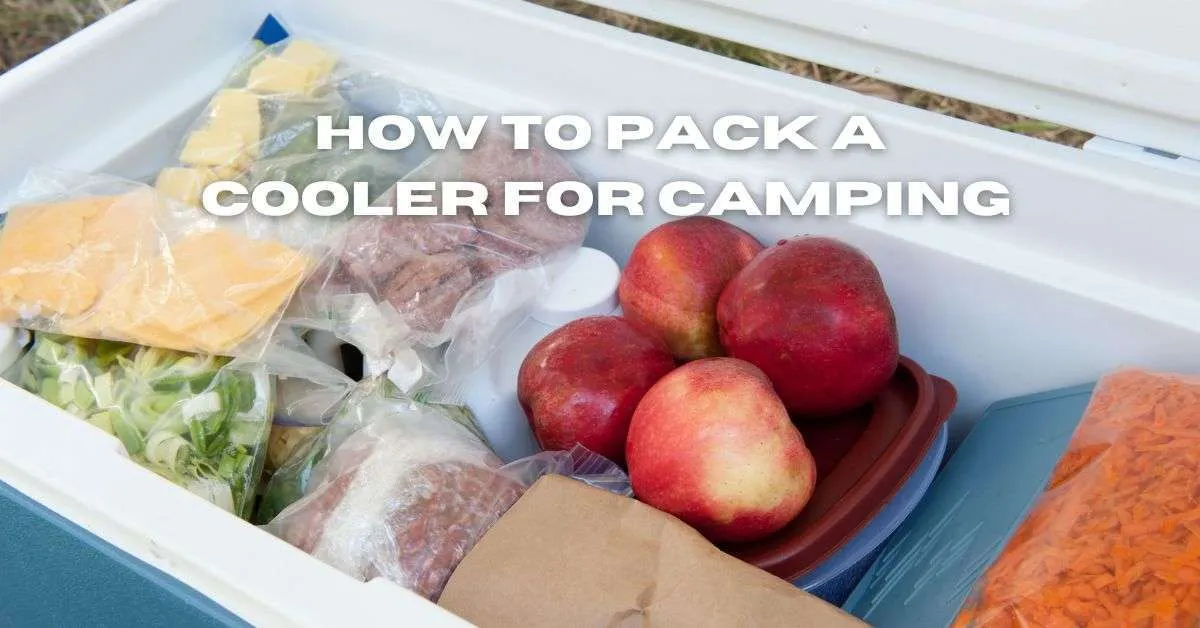
One of the most important things to keep in mind when packing a cooler is to keep everything organized. This means separating your food and drinks into different sections of the cooler, and using containers or bags to keep everything in its place.
It’s also a good idea to pack your cooler in layers, with ice or ice packs on the bottom, followed by food and drinks, and then another layer of ice on top. This will help keep everything cool and prevent any items from getting crushed or damaged.
Understanding the Basics
When it comes to packing a cooler for camping, there are a few basic things to keep in mind. Here are some tips to help you pack your cooler like a pro:
1. Choose the Right Cooler
The first step to packing a cooler for camping is choosing the right cooler. See our Best Camping Coolers article here. You want a cooler that is large enough to hold all your food, while still having enough space for the ice. Consider the size of your group and how long you will be camping when choosing a cooler. A 50 Liter cooler is a great size for a couple of people for 2-4 days.
When it comes to brands, there are a lot of options out there. Yeti Tundra cooler is a popular choice among campers due to its durability and features. However, it can be quite expensive. If you’re on a budget, there are plenty of other options that are more affordable and still get the job done.
Our Top Coolers
Bodega Coolers
The Bodega Cooler with Wheels steals the spotlight with its unbeatable portability, durability, and impressive features – a must-have for outdoor enthusiasts!

Yeti Coolers
Yeti coolers are known for their unmatched durability and exceptional ice retention. They are the epitome of reliability, perfect for extended camping trips when keeping your belongings cool is crucial. These coolers are rugged and expertly crafted for outdoor adventures.

Coleman Coolers
Coleman Ice Chests offer a range of versatile and affordable options for family camping. They come in various sizes to meet your needs. With their innovative design, Coleman coolers effectively keep your food and drinks chilled while remaining budget-friendly.

Orca Coolers
Orca coolers are meticulously designed with a focus on insulation and ice retention. They are the top choice for outdoor enthusiasts who want to keep their contents chilled for days. The durable construction and various sizes make Orca coolers perfect for all camping needs.

2. Pre-Chill Your Cooler
To keep your food cold for as long as possible, pre-chill your cooler before you start packing. This means storing it in a cool place for a few hours before you add your food and ice. This will help your cooler retain the cold temperature for a longer period of time.
3. Pack Your Cooler Strategically
When it comes to packing your cooler, there are two theories on the order to pack the layers for food safety: First-In-Last-Out (FILO) and Rotation-Meal-At-Bottom (RMAB). FILO means you pack your cooler in the order that you will use the food, with the items you’ll use last at the bottom. RMAB means you pack your cooler with the meals you’ll eat at the end of the trip at the bottom and work backwards.
Regardless of which theory you subscribe to, there are some general tips to keep in mind. Pack your cooler with the heaviest items at the bottom, and lighter items on top. Use ice packs instead of loose ice, as they will keep your food dry and prevent it from getting waterlogged. And be sure to pack your cooler tightly to prevent air pockets and keep the cold air inside.
By following these basic tips, you’ll be able to pack your cooler for camping like a pro.
Choosing the Right Cooler
When it comes to choosing the right cooler for camping, there are a few things to keep in mind. The first thing to consider is the size of the cooler. You want to make sure that you have enough space for all of your food and drinks, but you don’t want a cooler that is too big because it will be heavy and difficult to transport. Yeti coolers are a popular choice for camping because they are durable and come in a variety of sizes.
Another important factor to consider when choosing a cooler is insulation. A cooler with thick walls and good insulation will keep your food and drinks cold for longer periods of time. Hard-sided coolers are generally more efficient than soft-sided coolers because they have thicker walls. Look for a cooler that has at least two inches of insulation.
Durability is also important when choosing a camping cooler. You want a cooler that can withstand the rigors of camping and outdoor activities. Look for coolers that are made from high-quality materials and have reinforced corners and hinges. Yeti coolers are known for their durability and are a popular choice for camping.
Locks are another important feature to consider when choosing a cooler. You want to make sure that your food and drinks are secure and won’t be accessed by animals or other campers. Look for coolers that have locking mechanisms or can accommodate a lock.
In summary, when choosing a cooler for camping, you want to consider the size, insulation, durability, and locks. Yeti coolers are a popular choice because they are durable and come in a variety of sizes. Look for a cooler with at least two inches of insulation and reinforced corners and hinges. Make sure your cooler has a locking mechanism or can accommodate a lock to keep your food and drinks secure.
Preparation Before Packing
When it comes to packing a cooler for camping, preparation is key. Taking the time to properly prepare your cooler and food before packing can make all the difference in keeping your food fresh and safe to eat throughout your trip.
One of the first steps in preparing your cooler is to ensure that it is clean. Before packing, give your cooler a thorough cleaning with warm, soapy water and allow it to dry completely. This will help prevent any bacteria or contaminants from getting into your food.
Another important step in preparing your cooler is to pre-chill it. This can be done by placing a few bags of ice in the cooler the night before you plan to pack it. This will help bring the temperature of the cooler down, allowing it to better maintain the temperature of your food and ice.
In addition to preparing your cooler, it’s also important to prepare your food before packing. This includes any necessary food prep or meal prep, such as chopping vegetables or marinating meats. By doing this ahead of time, you can save time and hassle while camping and ensure that your food is ready to go when you need it.
Lastly, consider planning out your meals and recipes ahead of time to make packing your cooler easier. This can help ensure that you have all the necessary ingredients and supplies on hand, and can also help prevent overpacking or forgetting important items.
Packing Techniques
When it comes to packing a cooler for camping, there are a few techniques that can help you maximize space and keep your food and drinks cold for longer. Here are some tips to pack a cooler like a pro:
Use Containers
Using waterproof plastic containers is a great way to keep your food dry and organized. Make sure to choose containers with tight-fitting lids to prevent water from getting in. You can also use re-sealable plastic bags for smaller items like snacks or condiments.
Layer Your Items
Layering your items is a great way to maximize space and keep your cooler organized. Start with a layer of ice at the bottom, then add your drinks and heavier items. Next, add a layer of ice and then your food items. Make sure to keep raw meats on the bottom to prevent cross-contamination.
Fill Air Pockets
Air pockets can cause your ice to melt faster, so it’s important to fill them with something. You can use crumpled newspaper, towels, or even extra clothing to fill the gaps. This will help keep your cooler colder for longer.
Organize Your Cooler
Organizing your cooler is key to making the most of your space. Keep frequently used items at the top for easy access, and pack items tightly to prevent shifting during transport. You can also use a cooler basket to keep smaller items organized and prevent them from getting lost in the ice.
Load Your Cooler Last
When packing your cooler, make sure to load your items in the order you will need them. This will prevent you from having to dig through the cooler to find what you need. Pack your cooler last so that it stays cold for as long as possible.
By using these packing techniques, you can pack a cooler for camping like a pro. With a little planning and organization, you can keep your food and drinks cold and fresh for your entire trip.
Food and Drink Selection
When it comes to selecting food and drinks to pack for your camping trip, there are a few things to keep in mind. First and foremost, you want to make sure that you are packing items that are easy to transport and won’t spoil quickly.
For perishable foods like meats and eggs, it’s important to keep them cold in a separate cooler from your drinks. This will prevent cross-contamination and ensure that your food stays safe to eat. Consider using a cooler with separate compartments or using a divider to keep your food and drinks separate.
When selecting meats, opt for cuts that are easy to cook and won’t take up too much space in your cooler. Chicken breasts, ground beef, and sausages are all great options. You can also pre-cook some of your meats at home and then reheat them over the campfire for an easy and delicious meal.
For vegetables, choose items that are sturdy and won’t bruise easily, such as carrots, bell peppers, and zucchini. These can be pre-chopped at home and stored in resealable bags or containers. Don’t forget to pack some condiments like ketchup, mustard, and mayonnaise to add flavor to your meals.
When it comes to drinks, consider packing a mix of water, sports drinks, and juices. Make sure to pack enough for everyone in your group and consider bringing a separate cooler just for drinks. This will make it easier to access them throughout the day without having to dig through your food cooler.
Finally, it’s important to practice good food safety habits when camping. Make sure to wash your hands frequently and use separate cutting boards for meats and vegetables. Keep hot foods hot and cold foods cold, and don’t leave perishable items out in the sun for too long. By following these simple tips, you can ensure that your camping trip is both safe and delicious.
Proper Ice Usage
When it comes to packing a cooler for camping, proper ice usage is crucial to ensure that your food stays fresh and safe to eat. Here are some tips on how to use ice effectively:
Pre-Chill Your Cooler
One of the most important steps to take before packing your cooler is to pre-chill it. This means placing a bag of ice or ice packs in your empty cooler and leaving it in a shaded area for at least 24 hours before adding your food. This helps to cool down the interior of the cooler and ensures that your ice will last longer.
Use Ice Packs or Block Ice
When choosing the type of ice to use in your cooler, consider using ice packs or block ice instead of regular ice cubes. Ice packs and block ice tend to last longer and are less likely to melt and create a mess in your cooler. If you do use regular ice cubes, try to use larger ones as they will melt more slowly than smaller cubes.
Freeze Your Food and Drinks
Another way to extend the life of your ice is to freeze your food and drinks before packing them in your cooler. This not only helps to keep them fresh but also acts as extra ice to keep your cooler cold. Just make sure to leave some space in your cooler for the frozen items to thaw as they will create additional moisture.
Place Ice at the Bottom
When packing your cooler, place the ice at the bottom as cold air sinks and will keep the ice at the bottom frozen for longer. This also helps to cool down the food and drinks on top of the ice. You can also use a layer of frozen water bottles or ice packs at the bottom of the cooler to help with ice retention.
Consider Dry Ice
If you’re going on a longer camping trip and need your ice to last for several days, consider using dry ice. Dry ice is much colder than regular ice and can last up to three times longer. However, it’s important to handle dry ice with care as it can be dangerous if not used properly.
By following these tips, you can ensure that your cooler stays cold and your food stays fresh during your camping trip.
Packing Perishable and Non-Perishable Food
When packing a cooler for camping, it’s important to consider which foods are perishable and which are non-perishable. Non-perishable foods, such as canned goods, crackers, and dried fruits, can be packed without worry of spoilage. Perishable foods, on the other hand, need to be kept cold to prevent the growth of bacteria and spoilage.
When packing perishable food, it’s important to keep them at a safe temperature of 40°F or below. To do this, start by lining the bottom of the cooler with a layer of block ice. Cubed ice may get things colder than block ice, but block ice lasts much longer, which is why it’s recommended by experts. Place perishable food on top of the ice, making sure to keep them separated from each other and from non-perishable items.
When packing eggs, it’s best to bring them in a hard-sided container to prevent them from breaking. Alternatively, you can crack them into a sealable container to save space. Condiments, like ketchup and mustard, should be packed in small, sealable containers to prevent leaks.
Vegetables can be packed in sealed, reusable waterproof containers to keep them fresh and prevent them from getting crushed. Meats should be pre-sliced and packed in plastic bags or sealed containers to prevent cross-contamination.
Remember to keep an eye on the temperature of the cooler and replenish the ice as needed. Avoid opening the cooler unnecessarily to keep the temperature inside consistent. By following these tips, you can ensure that your perishable food stays fresh and safe to eat during your camping trip.
Maintaining Food Safety
When packing a cooler for camping, it’s important to keep food safety in mind to prevent foodborne illnesses. Bacteria can grow quickly in perishable food items like meat, dairy, and eggs, especially in warm temperatures. Here are some tips to help maintain food safety while camping:
Pre-cool the Cooler
Before packing your cooler, pre-cool it by placing ice or ice packs inside for a few hours. This will help the cooler stay colder for longer and keep your food at a safe temperature. You can also pre-chill your food items in the refrigerator or freezer before packing them.
Pack the Cooler Properly
When packing your cooler, separate raw meats from other food items to prevent cross-contamination. Use a food thermometer to ensure that meats are cooked to the proper temperature before packing them. You can also use frozen water bottles or gel packs to keep your cooler cold and your food safe.
Store the Cooler in a Shaded Area
When camping, try to store your cooler in a shaded area to prevent it from getting too warm. Keep it away from direct sunlight and try to avoid opening it too frequently to keep the temperature consistent.
Clean and Sanitize Utensils and Surfaces
When preparing food, make sure to clean and sanitize all utensils and surfaces to prevent the spread of bacteria. Use hot, soapy water to clean dishes and utensils, and bring along sanitizing wipes or a solution of water and bleach to sanitize surfaces.
By following these tips, you can help ensure that your food stays safe and free from harmful bacteria while camping.
Using Reusable Items
When packing a cooler for camping, using reusable items can help reduce waste and make packing easier. Here are some reusable items to consider:
Containers
Using reusable containers can help keep food organized and prevent it from getting soggy. Look for containers with tight-fitting lids to prevent leaks. Mason jars are a great option for storing items like salads, overnight oats, and snacks. Plastic containers are also a good choice, but be sure to choose BPA-free options.
Reusable Ice Packs
Instead of using disposable ice packs, consider investing in reusable ice packs. These can be frozen and used over and over again. Look for ice packs that are slim and fit easily into your cooler. Some ice packs are even designed to be flexible, so they can be wrapped around items in your cooler.
Utensils and Plates
Using reusable utensils and plates can help reduce waste and make cleanup easier. Look for lightweight, durable options that are easy to pack. Consider bringing a set of reusable silicone bags for storing snacks and leftovers.
Cloth Napkins and Towels
Instead of using paper napkins and paper towels, consider bringing cloth napkins and towels. These can be washed and used over and over again. Look for lightweight options that dry quickly.
Using reusable items can help reduce waste and make packing for camping trips easier. Consider investing in reusable containers, ice packs, utensils, plates, cloth napkins, and towels to make your next camping trip more sustainable.
Packing for Overnight Camping
When packing for an overnight camping trip, it’s important to be prepared and organized. Here are some tips to help you pack efficiently and effectively:
Make a Checklist
Before you start packing, make a checklist of all the gear and supplies you’ll need. This will help ensure that you don’t forget anything important. Be sure to include items like a tent, sleeping bag, sleeping pad, camp stove, cookware, utensils, food, water, and a cooler.
Choose the Right Cooler
When it comes to food storage, a good cooler is essential. Look for a cooler that is durable, well-insulated, and the right size for your needs. Consider whether you’ll be car camping or backpacking, and choose a cooler that is appropriate for your trip.
Pack Food Efficiently
When packing food for your camping trip, it’s important to be organized and efficient. Use resealable plastic bags and food storage containers to keep your food fresh and prevent spills. Pack your cooler in layers, starting with a layer of ice or ice packs on the bottom. Place your food on top of the ice, and then add another layer of ice on top.
Plan Your Meals
When planning your camping meals, think about what foods will be easy to prepare and cook over a camp stove or fire. Consider meals that can be prepared ahead of time and reheated on site. Don’t forget to pack snacks and plenty of water to stay hydrated.
Be Prepared for Emergencies
When camping overnight, it’s important to be prepared for emergencies. Pack a first-aid kit with basic supplies like bandages, antiseptic, and pain relievers. Bring a map and compass, and know how to use them. And always let someone know where you’re going and when you plan to return.
By following these tips, you can pack efficiently and effectively for your overnight camping trip.
Cooler Maintenance and Care
As someone who loves to go camping, I understand the importance of taking good care of my gear, especially my cooler. Proper maintenance and care of your cooler can extend its lifespan and help keep your food and drinks fresh and safe to consume. Here are some tips for maintaining and caring for your cooler.
Cleaning Your Cooler
Cleaning your cooler is an essential part of its maintenance. After each camping trip, I make sure to clean my cooler thoroughly. Here’s how I do it:
- Empty the cooler and remove any remaining ice or water.
- Use a solution of mild soap and warm water to clean the interior of the cooler.
- Rinse the interior with clean water and let it air dry.
- Wipe down the exterior of the cooler with a damp cloth.
- Store the cooler in a shaded area to prevent sun damage.
Defrosting Your Cooler
If you use your cooler frequently, it’s important to defrost it regularly. Here’s how I do it:
- Empty the cooler and remove any remaining ice or water.
- Leave the cooler open in a shaded area to allow it to defrost naturally.
- Once the ice has melted, use a solution of mild soap and warm water to clean the interior of the cooler.
- Rinse the interior with clean water and let it air dry.
Gear Maintenance
When packing your cooler, make sure to keep it away from sharp objects that could puncture or damage it. I always use a cooler basket to keep my food and drinks organized and to prevent them from shifting around during transport.
Outdoors Considerations
When using your cooler outdoors, it’s important to keep it in a shaded area to prevent it from overheating. Direct sunlight can cause the temperature inside the cooler to rise, which can lead to spoilage and foodborne illness.
By following these simple maintenance and care tips, you can keep your cooler in top condition and ensure that your food and drinks stay fresh and safe during your camping trips.
Additional Cooler Hacks
When it comes to camping cooler hacks, there are a few additional tips and tricks that can make a big difference in keeping your food and drinks cold and fresh. Here are some of my favorite hacks:
Use a Foam Pad
Placing a foam pad underneath your cooler can help insulate it from the ground and keep it colder for longer. This is especially important if you’re camping in hot weather or on a warm surface like sand or pavement. You can use a yoga mat, sleeping pad, or even a piece of foam insulation to create a barrier between your cooler and the ground.
Freeze Water Bottles
Instead of using ice packs, freeze water bottles and use them to keep your cooler cold. Not only will this save space in your cooler, but it will also provide you with cold drinking water as the ice melts. Just make sure to leave some room in the water bottles for expansion as the water freezes.
Use a Newsletter
If you’re planning on camping for an extended period of time, consider creating a newsletter to keep everyone informed about what’s in the cooler and when it needs to be restocked. This can help prevent people from constantly opening and closing the cooler, which can let warm air in and cause the temperature to rise.
Create a Cooler Inventory
Before you head out on your camping trip, create an inventory of everything you’re putting in the cooler. This can help you keep track of what you have and prevent you from overpacking or forgetting important items. You can use a simple spreadsheet or a piece of paper to create your inventory.
Use Ziploc Bags
Ziploc bags are a great way to keep your food organized and prevent it from getting wet or soggy. Use them to store items like sandwiches, fruit, and snacks. You can also use them to pre-measure ingredients for meals, which can save you time and hassle when you’re cooking at the campsite.
By using these additional cooler hacks, you can ensure that your food and drinks stay cold and fresh throughout your camping trip.
Frequently Asked Questions
What are some hacks for packing a cooler for camping?
When packing a cooler for camping, there are several hacks you can use to make the most of the space and keep your food fresh. One hack is to freeze water bottles or juice boxes and use them as ice packs. This not only keeps your food cold but also provides you with cold drinks as the ice melts. Another hack is to use waterproof plastic containers or re-sealable plastic bags to prevent water from getting into your food. Additionally, using a cooler basket to keep your food above the ice will help prevent it from getting wet.
How do you pack a cooler with cans for camping?
Packing a cooler with cans for camping can be tricky, but there are a few tips you can follow to make it easier. First, remove the cardboard flaps on one end of the box and place it upside down in the cooler. Then, surround the box with ice to create a stabilizing wall. Alternatively, you can use can holders or foam inserts to keep the cans in place. It’s also a good idea to pack the cans tightly to prevent them from shifting around and getting damaged.
What is the most efficient way to pack a camping cooler?
The most efficient way to pack a camping cooler is to start with a layer of ice at the bottom, followed by your food and drinks. Be sure to pack the cooler tightly to prevent air pockets and maximize the space. It’s also a good idea to separate your food into different containers or bags to prevent cross-contamination and make it easier to find what you need. Finally, top off the cooler with another layer of ice to keep everything cold.
How do you use a cooler as a fridge while camping?
To use a cooler as a fridge while camping, you’ll need to keep it as cold as possible. One way to do this is to pre-chill your food and drinks before packing them in the cooler. You can also use frozen water bottles or gel packs to keep the temperature low. Another tip is to keep the cooler in a shaded area or cover it with a blanket or tarp to prevent it from heating up in the sun.
Should you put ice on top or bottom of a camping cooler?
When packing a camping cooler, it’s generally recommended to put ice on top of your food and drinks. This helps keep everything cold and prevents the ice from melting too quickly. However, some people prefer to put ice on the bottom to create a cold base for their food. Ultimately, it comes down to personal preference and the type of cooler you have.
Can you use dry ice for camping cooler packing?
Yes, you can use dry ice for camping cooler packing. Dry ice is much colder than regular ice and lasts longer, making it a great option for longer camping trips. However, it’s important to handle dry ice with care and follow the manufacturer’s instructions. Dry ice can be dangerous if not handled properly, so be sure to wear gloves and use caution when handling it.
When I'm not doing sleep research, I absolutely love getting out in the great outdoors. Furniture and interior design are among my favorite topics to explore. Being a qualified interior designer and an expert in the field of furniture, I constantly seek new trends and styles in the industry. It's fascinating to learn about different pieces and how they integrate into homes. Moreover, furniture and interior design have the power to bring people together and create a sense of comfort in any space. By writing about these topics, I get to share my knowledge and creative ideas while inspiring others to find the perfect pieces for their own spaces.
- Why Do My RV Lights Dim and Brighten? Understanding Voltage Fluctuations - February 8, 2024
- What Happens When RV Furnace Runs Out of Propane: Avoiding the Chill on Your Trip - February 8, 2024
- How Much Does an RV Inspection Cost: Budgeting for Your Next Adventure - February 8, 2024


